This is an onboarding guide to help you get started in VM and the rest of our systems
Are you already up and running? Go here to get started with your POS!
Looking to set up your KDS? Go here!
Got a printer to set up? Go here!
Table of contents:
- Create your venue
- Set up your menu and articles
- Create your layout
- Create your kitchen ticket stations
- (optional) Set up your tables
You are here to get started with your Baemingo system. Great!
Before you get started with your Point of sale system you of course need to set up your menu and create the layout you'll be working with. This guide will walk you through all the steps needed to get going and to understand the Baemingo backoffice!
To start with you need to log into VM of course. Follow this link and login before continuing the guide: https://vm.baemingo.se/#/
STORE - Creating your venues and assigning menus
We want to start by creating our venue! Depending on your setup you might want to create multiple venues, but here we will guide you through all the steps of creating a new venue in the Baemingo backoffice which you can then follow to create multiples if needed.
Once logged into the VM, the backoffice for your Baemingo services, we want to start by pressing "Store" in the left side menu and then going into "Venues".
Here you will be able to see all of your created venues in a list and at the top create new venues using the "Create new" button. You'll want to create a venue in VM for each venue that you have.
Now when you press the "create Venue" button at the top a menu will open to the right side of the screen which will ask you for the information needed. It's easy to fill in and we'll go over all the options right below!
 Name: Your name for the Venue. This name will appear on your receipts
- VAT No: Your registered number, Org number in swedish.
- Legal Name: Your companys legal name. This will be displayed on receipts.
- Your venues address: This will be displayed on your receipts and is required.
Right below you'll want to enter the street, city and zip code separately - Latitude/longitude not needed?
- Timezone: Pick the timezone that best aligns with where your venue is
- Phone number & Support email:
This information will be displayed on your receipts for customers so do be careful with the number and email you enter here - Image: This will be desplayed in your Baemingo app if you have one for customers to order from.
Right below you can activate or deactivate this picture. - The last two fields can be freely entered
First you can enter a delivery fee if delivery is something you offer app customers
Then if you're using staff codes you can enter how long the POS can remain idle before being logged out.
Those are all the fields that need to be entered for your venue to be created. You'll now be able to create users connected to this venue to log into your POS and right below the above options you'll find a few choices to assign your menues too. Multiple menues can be useful if you have multiple venues with different articles. Otherwise if all venues have the same articles then a recommendation would be to just create multiple POS layouts, something we'll be going over at a later step!
PIM/POS - Setting up menus and your article library
What you will first get to is the PIM page, your Product Information Manager or Product library for short. This is where you can manage your articles, categories, menus, ingredients among other things all by yourself!
The thing to start creating is your menu. The menu is the list of items you connect to your POS and APP to be available for use. In the top row of PIM options, press "Menu", then press the "new menu" button, enter the name you want for your menu and press save. That's how easy it is.
If you alreade have items created you can add them to your menu after the fact too by pressing on your menu in the list and then in the right menu pop up press "Add articles" at the bottom and you can add articles directly to your menu from here.
Now with your menu created, you want to start creating your categories. 
You need a name for the category which you enter at the very top.
(If you have the app) The description is optional and can only be seen in your app by customers.
Below that you can assign this category to be the child of another category, say you have a parent category called spirits and then you have children categories under that called "Vodka", "Rum", "Whisky" and so forth. You then add your items to the children categories.
Course type can be set as well in this stage if that is something you will be using. You can create the different course types you will be using in the top row of the PIM.
Below that you set your VAT percentage. VAT is set of course depending on your country of residence, all items added under this category will have their VAT set by it. If you are unsure of what VAT to set the category too, you should be able to look this up online.
After that are some optional customisations. You can pick what color items added to this category will have when later added to the POS layout.
(If you have the app) You can hide the category from appearing in the app order flow for customers.
(If you have the app) You can set how high or low in the list of available categories that it will appear in the app view for customers.
(If you have the app) Lastly you can assign a picture to the category. Any pictures you upload here for use will be able to access them always through our website.
Now with all that entered press the "Create category" button at the bottom of the menu. Your new category will now be created in the list to the left. Go through these steps and create all the necessary categories you will use, then you can move on to creating you articles!
Creating your articles is quite easy with the above steps already done and once you've gotten then hang of it. We'll be going through all of the steps with pictures right here!
To get started, at the top of the PIM menu press "articles" and you'll be taken to the article tab. Here you will all of your categories to the right, which you can use to sort your articles by when created. At the top you'll see the options "New article" and "Export/Import". The "Export/Import" option requires a premade excel sheet (.xlsx) in a very special format but can then add a large list of items to your library at once. If you do not have this list, start adding items using the "New article" button.
Here you'll notice a menu will open up to the right, displaying all your options for your article. All fields noted with a * are required fields
 You want to start by entering your article name at the top.
Going down you're then going to choose the category this article belongs too. Your category settings will transfer over here, so VAT and if you chose a course type will be set automatically.
Choose a unit type if you're going to be selling this and the customer can choose how many units of it they want, like cl, g or kg. With this setting on you'll be prompted for how many units you want to buy every time you press the article in the POS.
Price is of course important, this will decide how much you're selling the product for. This price includes VAT, and if you chose a unit type earlier remember that this price will multiply by how many units you pick every time.
You then want to assign the article to a menu. If you have multiple venues with different menus then assign the article to those that have it on the menu.
(Optional) Default order status on the KDS is for customers who have a Kitchen display screen and they want certain articles to appear as something other than ready when appearing on the screen.
The other functions are all optional but useful functions that might be useful in specific cases
Allow custom pricing means you always set the price of the product when making a purchase in the POS. If you activate this feature, remember to set the price of the product to 0 and then you'll always be prompted to enter the price in the POS. Useful if you have certain articles that that have flexible or shift in price often.
Age restricted only works in the app. This will prompt the customer that this article is for those 18 or older. Useful if you're selling alcohol or something else in the app for those 18+.
No membership discount also only works in the app. This means that if you have different memberships in the app with discounts attached, articles with this activated will not be included in any of those discounts.
Visible end of day report means
Scrolling down you'll also be able to enter a description as well as choose a picture for your article. These are optional and will only appear in your app if you have that as part of your Baemingo solution.
If you continue down you will have multiple ingredient options to add to your articles.
PIM/POS - creating a layout

A layout is not a necessary step to using your POS but highly recommended, so you can create and use your Baemingo POS the way you want to and set up your articles in a way that fits you.
To get to the POS layout page, when in the PIM menu at the bottom you should see marker that show PIM marked in white and POS marked in black. Press the POS part of the marker and you'll be taken from PIM to the POS layout editer.
Now in the beginning the POS screen will just be dark with a single button asking to "create a layout". Press this button and a menu will open on the right side of the menu. At the top you'll want to enter the name of your menu and you can the start naming your pages that will be created. Do not worry about creating all your pages now though, as you can easily add more pages after you've created your layout
Once your layout is created, you'll be able to see all your pages to the left of a grid system. This grid can be customised to be anywhere from 2 to 6 grids in rows down. To customise your grid and add items to it, check the left side menu.
 At the top you can rename the page you're on.
You can set the button color below the name. This will change the color of page in the list to the right of the grid.
You can adjust your grid, freely change between the 5 options available and pick the one you feel works best for that page for you.
Below that you can add and create subpages. Subpages are buttons you can add top your layout that take you to a new page. For example, you could create a pasta subpage, which when pressed in the POS would take you to a new page where you have all of your pasta articles added.
You can create as many subpages as you want and add to whatever pages you want
Below subpages and bundle offe
rs you'll see a field asking you to search for articles or categories, right below that you'll see your entire article library that you created in PIM.
Here you simply press "add" on the articles you wish to add to the current page as a button and it will get added as for to the upper right of the screen as possible, after which you can drag and drop the button around as you want
The layout to the right will be displayed exactly like that on your point of sale, the array of your buttons, the color and name of your buttons and pages. Create as many pages as you want, choose whatever grid you feel fits your pages best, add your articles and adjust their colors and names and then add a subpage or two if you feel like you have too many buttons on each page.
That's all you need to do to create your layout and it's all saved automatically to the cloud
Follow these steps and create as many menus as you'd like, you can in the point of sale pick and change layout you want to use whenever you want to.
STORE - Creating kitchen ticket stations
With your menu ready, articles created and layout customised the last thing to do is set up your kitchen stations. These will be used by your kitchen printers and/or kitchen display screens to show only the items you want them too, so your kitchen knows exactly what to cook.
Start by pressing "Store" in the left side menu and then go into the "Stations" tab.
Here you'll be able to see a list of all your created stations, which you'll be able to edit as you wish after they're created, but to create a new station you'll want to press "Create station" in the upper right corner.
In this new menu, start by entering a name for your new station. Note that kitchen ticket stations can be created for both physical and digital tickets, so you can control physical tickets and what's viewed on kitchen display screens.
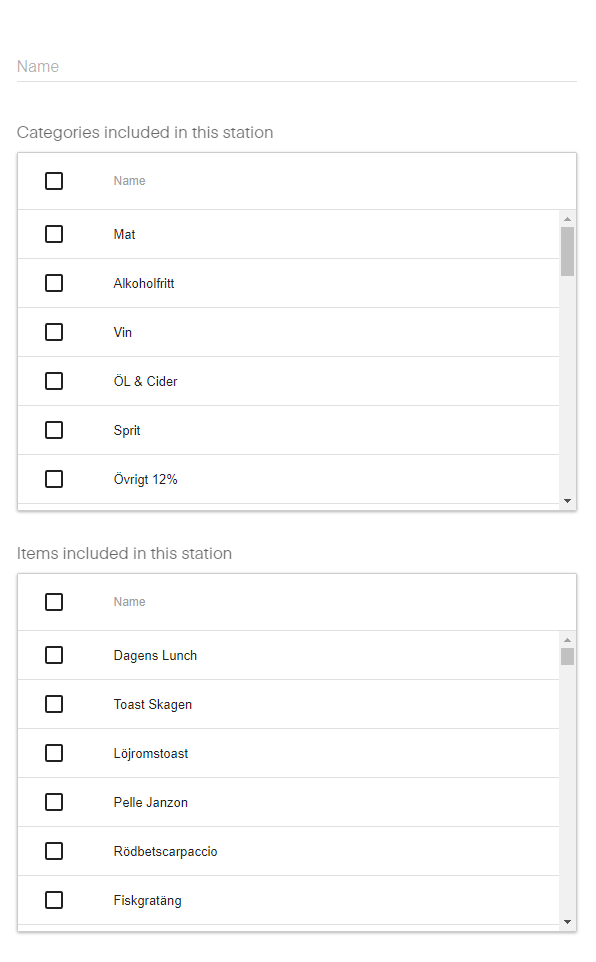
Know that whatever category you add to your station, all items belonging to that category till then send a kitchen ticket when ordered.
If you want to only add a few items from a certain category to the station, the use the second check list for items instead of the first one for categories.
If you would like to still see all other items from orders also come out with this kitchen station, but marked as not part of it there is one last setting you can activate right above the submit button. "Show all other order items not included in station".
To assign your kitchen ticket stations to a physical printer, log into your Baemingo app on your ipad that the printer is connected to. Go into the settings in the Baemingo app and you should start at the printer page. Click on the printer you want to add your station too and in the menu that pops up, press the "Assign station" option and you'll then be able to assign your station.
TSR - Setting up your tables (optional)
If you're a restaurant using table service, you'll want to set up your table map. This can also be done in VM.
To create your table map, you must start by creating a floorplan to customise with your tables. Press "TSR" in the left menu and pick "Floorplans". Press "Create Floorplan" in the upper right corner, then simply enter a name for the floorplan and choose which venue it should be connected too. You can create one floorplan for your entire restaurant or view each floorplan as rooms. Create as many as you want and so you can set up your workflow the best.
Now with your floorplan created, it's time to start customising it. Press "TSR" in the left menu again and this time choose "Tables" right below Floorplans.
Here you'll be able to customise your floorplan. At the top you can choose which venue you want to work with, which floorplan of that venue you want to customize and also adjust the background for the device you'll be using (ipad or ipad pro).
Note that you can place tables outside of the black background, but doing so may look odd or place tables out of screen depending on the dimensions of your screen.
To create a table to add to your layout, simply press the "Create table" button in the upper right corner, give it a short name or a number and then it will be added to the screen. Afterwards you can drag and drop the table to wherever you want to.
When you're done adding and moving your tables, remember to always press "Save" next to create table in the upper right corner.